
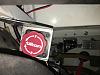
Mine's a ListerBell, but here's where I put mine.
Not that I'm a pessimist or anything, but I also put the decals onto the bulkhead underneath the bonnet (in case the bonnet is
not there when you want to know what's what!).
Mark


Mine's a ListerBell, but here's where I put mine.
Not that I'm a pessimist or anything, but I also put the decals onto the bulkhead underneath the bonnet (in case the bonnet is
not there when you want to know what's what!).
Mark
"a theory should be as simple as possible, but not simpler"

When I converted to LHD a couple of years back I moved the wiper to the other side of the scuttle plinth. That left a gaping hole from the original spindle position so I used that for the plumber in extinguisher button. I guess you could put a mechanical system pul handle there too?
Guy

Here is mine!

Well I have now installed a Lifeline 360 3kg fire extinguisher. I selected this system as the kit includes everything you need and uses Novec™1230 suppressant.
The push fit pipework is really easy to use although I did buy some additional 90 degree elbows to make the pipe runs as neat as possible.
I fitted the cockpit nozzles into the footwell on the heater air distribution box. Two of the engine bay nozzles are located either side of the engine with one of these pointing at the exhaust system. The third engine bay nozzle is aimed at the carburettors. The fuel tanks get plenty of coverage.
Whilst installing this system I took the opportunity to redesign the centre console and improve the gear change mount points. The gear change is much improved.

Paul will you bring to the Bell today for a nose!
Tim
Originally Posted by Paul Eustace

Below are some photographs of my recent work to fit an OBP accelerator pedal, finally install the remote brake balance bar control and fit a partial restrictor into the Laminova oil/coolant heat exchanger.
The oil temperature would rise to 90-95C when using the power. The coolant temperature always remains constant at 75-80C so I surmised that the Laminova needed more coolant passing through it's capillaries.
Having driven a couple of hundred miles since fitting the partial restrictor I can confirm the oil temperature never exceeds 85C and usually runs around 80C.
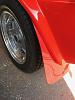
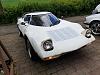
With a little time on my hands I decided to sort out a few issues. Front clam poor fitment, mud flaps to big and ugly, car is too high and the rear dampers are shot. The car has been on the road for 5 years so it is about time for action.
I modified the front clam mounts and removed the spacers I had fitted between the chassis and the front clam. I am very pleased that I managed level the front of the clam and move it right to get a reasonably good fit.
I cut down the mud flaps as they had remained in their, 'miles to big', original state which ensured I passed the IVA inspection.
Sent the rear Leda dampers off to Leda for testing and servicing. I received a very impressive report and Leda is working on returning them with modern internals. I have also bought shorter springs to enable me to attain the correct ride height.
I have bought a pair of 15" Protech Shocks for the front, again with shorter springs to enable me to get the front ride height down. I am awaiting delivery of some bushes from a local machine shop as I need to raise the damper mount on the track control arms. The modern alloy shocks require more point clearance than my existing antique steel dampers.
I also checked camber, castor and bump steer, just for fun.
I am hoping the FORC Snetterton track evening goes ahead at the end of June as I would like to take part. I entered the FORC Snetterton 100 Sprint last year and I want to get the suspension sorted before this years run.
I should say 'Thanks', to Craig White for his help in determining the correct damper and spring specifications.

All looking very impressive Paul !

Paul, how did you adjust the front clam point, been looking at mine all weekend, tried adding and removing shims, moving pivot point etc, but is doesn't want to move towards the passenger side at all
Considering just extending the bonnet edge out to compensate
Hi,
I needed my front clam to move right. I removed all the shims, washers, spacers. Then, with the LHS bolt just in it's nut far enough to engage the nyloc I simply wound the RHS bolt in until the clam lined up. Next I tightened the LHS bolt just enough to take up all the slack. You don't really need the spacers as each bolt prevents the clam moving left or right. One day I will probably get around the fitting them again but every time I remove the front clam they are a real pain.
 Posting Permissions

 Reply With Quote
Bookmarks