


Thankfully the Beta Coupe is sold !!.... Not let on to the tree huggers and the wildlife lovers just yet !!..
I'll keep my eye out for the mother....hammers are at the ready !
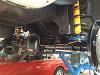
fitted bumpstops and pulled a little more underseal off.....perfect black paint underneath again
Also so axle is back in place....so it's coming on...slowly!

 Reply With Quote


Bookmarks